January saw a lot of prep of bits and pieces, but not a lot of finished art However February is a month of finishing things off. So the theory is that I will blog more this month.
I bought a Windsor and Newton 12" x 12" Sketch Book at the back end of last year as I liked the paper. I wasn't sure what I was going to do with it. Then when we were at a craft show the other week I was looking around the other stall as you do and saw a Mask from Splodge Away and just had to have it. An idea formed in my noggin and I had a theme for my sketch book. It is now my circle and square journal. All the pages are going to be designs predominantly based on circles and squares.
Unlike popular advise I always have to start a new journal or sketch book etc. on the first page, I just can't settle until it's done. So my first page is a very simple one based on my idea for my new Splodge Away Mask.
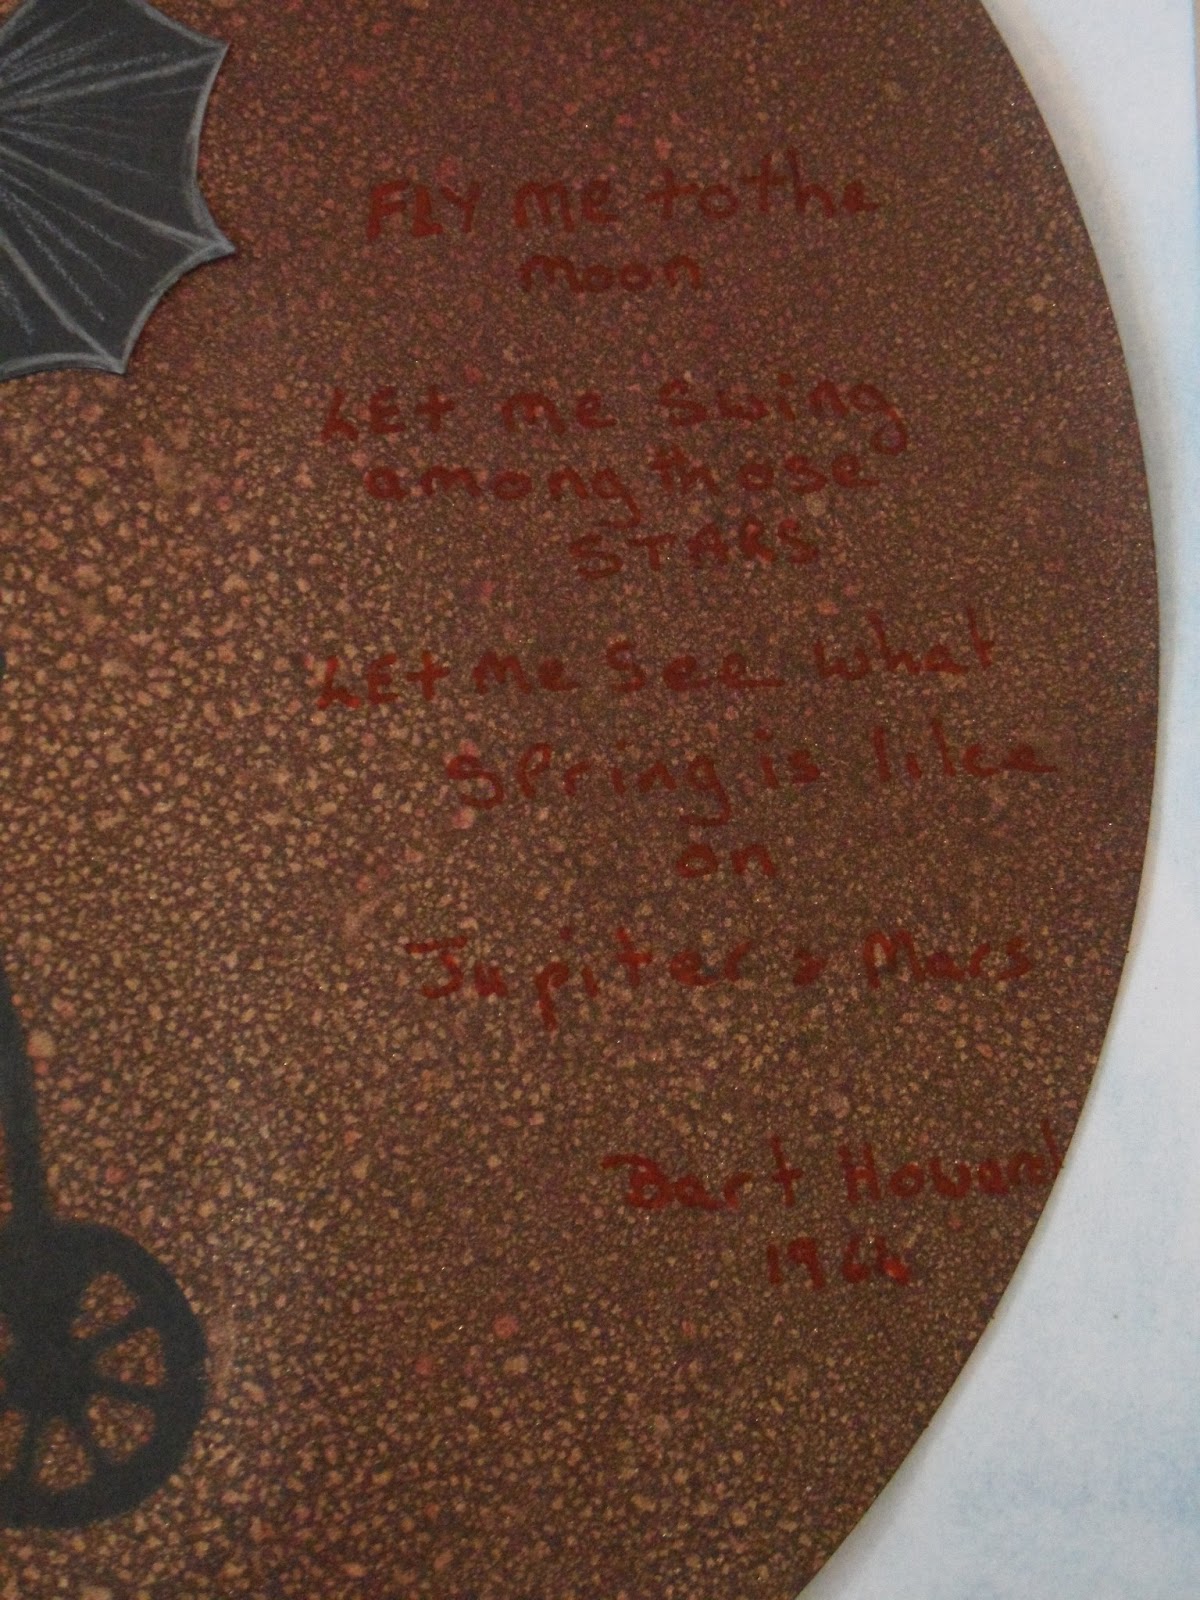
I placed the mask on a circle of black paper and sprayed with mica sprays in reds and coppers and bronzes. I left it to dry naturally as I wanted the pitted splattered effect of a rough surface.
I drew mechanical wings free hand and outlined with a silver pencil to create the effect of veins on the wings and attached to the man's coat. I was going to draw straps onto the man to represent a harness but, decided against it as I liked the silhouette. The stars are Sparkle Medium (Imagination crafts) stenciled through a star stencil I have in my stash. The words are written in red gel pen and come from a 1964 song by Bart Howard made famous by Frank and several of the other crooners 'Come fly me to the moon'. The page was distressed with shades of blue distress ink and the stamp is from Tim Holtz District Warehouse CMS 124 set. I was going to put more embellishments on it, however I like it simple and felt the need to walk way and call it done.
So until next time happy crafting
Georgina
Sunday, 10 February 2013
Tuesday, 15 January 2013
Tim Holtz 12 tags 2013 January
I can't believe where the 1st half of January has gone. The year started with a few lazy days with Ice skating (Mouse) and bowling (all of us) not easy when you can cough for England but enjoyable any way (Feeling much better now). Then back to reality, stock taking, shop cleaning, making sure Santa and his spare presents got back to the North Pole along with the bar and boat decorations. For the first few days they both looked bare now they just seem normal.
I promised myself that I would do something creative everyday this year and so far I have managed whether it has been baking, arts and crafts or writing/doodling in my journal. I have been a bit scatter gun in my approach and now have at least half a dozen unfinished projects. In fact the only thing I have completed is my January tag.
I embossed a piece of black card with a cog embossing folder. Then rubbed a white ink pad over the raised design. and dusted the paper with mica powders in copper, bronze and gold. I stamped on to a scrap of fancy pants paper that looks like a ledger using a variety of Tim's stamp sets and a stamp of a planetary globe, (I can't think of it's proper name) which was from a magazine that I just had to purchase as I loved the stamp how many other people do that, is it just me? The cogs and propeller are from eco crafts and I used tarnished brass Distress stain to colour them. Mouse is currently completing an art project for school using wire so I appropriated some to make springs to embellish my tag. The ribbon was coloured with a Pro Marker to match the tag. I then distressed it using a heat gun. I am quite pleased with the result, a good start to my tags 2013 I think.
Enjoy your crafting
Georgina
I promised myself that I would do something creative everyday this year and so far I have managed whether it has been baking, arts and crafts or writing/doodling in my journal. I have been a bit scatter gun in my approach and now have at least half a dozen unfinished projects. In fact the only thing I have completed is my January tag.
I embossed a piece of black card with a cog embossing folder. Then rubbed a white ink pad over the raised design. and dusted the paper with mica powders in copper, bronze and gold. I stamped on to a scrap of fancy pants paper that looks like a ledger using a variety of Tim's stamp sets and a stamp of a planetary globe, (I can't think of it's proper name) which was from a magazine that I just had to purchase as I loved the stamp how many other people do that, is it just me? The cogs and propeller are from eco crafts and I used tarnished brass Distress stain to colour them. Mouse is currently completing an art project for school using wire so I appropriated some to make springs to embellish my tag. The ribbon was coloured with a Pro Marker to match the tag. I then distressed it using a heat gun. I am quite pleased with the result, a good start to my tags 2013 I think.
Enjoy your crafting
Georgina
Monday, 31 December 2012
Tim Holtz 12 Tags of 2012 December
I can't believe where the year has gone. I closed my eyes and December just disappeared I have managed to complete 2 tags to complete Tim's 12 tags of 2012.
The 1st one is on grey card stock and has been stamped with the poinsettia stamp with perfect medium and finished with white perfect pearls. I then stamped the poinsettia on cream card using distress in festive berries and evergreen bough. I have then pulled some of the ink on to the leaves using a damp paint brush. I then decoupaged the flower head to create different colour layers and added a small silk flower to complete the bloom. I attached some tartan ribbon and some small charms.
For the second tag I inked a manila tag with Evergreen bough distress. The bauble is a steampumk design I think it is from the artistic stamper.I embossed the stamp using gold embossing powder on to card that I had distressed in the 3 winter seasonal distress colours. I then added some tartan ribbon a bit of mistletoe and a snowman button
I'm now off to complete my last elf task for the year a stock take of Santa's supplies before they are returned to the North Pole cupboard for the year and hopefully by the New Year we will be able to move in the shop and be able to find stored stock easily I love being an elf once a year, I love seeing the children who have been coming for years to see Santa on the boat and welcome new visitors , but I am so looking forward to a really tidy shop with stock stored where I can lay my hands on it when I need it without venturing into the north pole cupboard.
So until next time happy new year and keep crafting
Georgina
The 1st one is on grey card stock and has been stamped with the poinsettia stamp with perfect medium and finished with white perfect pearls. I then stamped the poinsettia on cream card using distress in festive berries and evergreen bough. I have then pulled some of the ink on to the leaves using a damp paint brush. I then decoupaged the flower head to create different colour layers and added a small silk flower to complete the bloom. I attached some tartan ribbon and some small charms.
For the second tag I inked a manila tag with Evergreen bough distress. The bauble is a steampumk design I think it is from the artistic stamper.I embossed the stamp using gold embossing powder on to card that I had distressed in the 3 winter seasonal distress colours. I then added some tartan ribbon a bit of mistletoe and a snowman button
I'm now off to complete my last elf task for the year a stock take of Santa's supplies before they are returned to the North Pole cupboard for the year and hopefully by the New Year we will be able to move in the shop and be able to find stored stock easily I love being an elf once a year, I love seeing the children who have been coming for years to see Santa on the boat and welcome new visitors , but I am so looking forward to a really tidy shop with stock stored where I can lay my hands on it when I need it without venturing into the north pole cupboard.
So until next time happy new year and keep crafting
Georgina
Friday, 30 November 2012
Tim Holtz 12 tags of 2012 November
November brings the frost to make your feet and fingers glow, so what better time to keep warm and cosy indoors and craft, craft, craft.
I have finished up with something totally different from what was started. Mostly because I needed to re-ink my clear embossing ink pad, after several attempts at getting a good impression with the un-inked pad and having to cut off the original wording which was quite large and said blessed, I eventually stamped my flower in a very light blue ink and heat embossed it. The re-inker is still on the loose I am sure it will find itself soon.
I used distressed inks to colour the background, the flowers and butterfly. Once I had removed the embossing powder from the flower I over stamped the flower with metallic distress stain and the word blessed is also stamped in the same stain and is about a 10th of the size of the original which took up a lot of my tag space. Having chopped the original tag about I mounted what was left of it onto black card to create my tag. I think I like the effect better than my original idea.
Happy crafting
Georgina
I have finished up with something totally different from what was started. Mostly because I needed to re-ink my clear embossing ink pad, after several attempts at getting a good impression with the un-inked pad and having to cut off the original wording which was quite large and said blessed, I eventually stamped my flower in a very light blue ink and heat embossed it. The re-inker is still on the loose I am sure it will find itself soon.
I used distressed inks to colour the background, the flowers and butterfly. Once I had removed the embossing powder from the flower I over stamped the flower with metallic distress stain and the word blessed is also stamped in the same stain and is about a 10th of the size of the original which took up a lot of my tag space. Having chopped the original tag about I mounted what was left of it onto black card to create my tag. I think I like the effect better than my original idea.
Happy crafting
Georgina
Thursday, 18 October 2012
Tim Holtz 12 tags of 2012 October
The tag that I had envisioned when I started is not the tag you see today.
It started out with the same premise a grave/tomb stone. I was thinking of Disney as my inspiration I love the walk through line of the hunted mansion with all the amusing sayings on the grave stones, I had several amusing ditties in my head I was going inscribe on to my grave stone along with a glittered black cat, some skeleton bones maybe a witches hat and broom, you get the picture. Instead I have ended up with something much more reflective.
I decided that I wanted to have an angel on my grave stone and as I had not used print on the background (as in Tim's tag) I decided to use print for the angel the closest thing to hand was an old news paper. While I was waiting for the ink to dry I was reading the paper as you do. It was an article about the lost of innocent life due to the interests greed, beliefs and the physical and cognitive behavior of others, which, got me thinking about how history has a way of continually repeating it's self, it seems we never learn what we never learn. Gosh! I sound very morbid and moralizing I don't mean to be, this is just my humble and simple tribute to all those innocent souls past, present and future, lost to the beliefs and actions of others.
The card stock is coloured in shades of grey Promarkers,The angel is a Crafty individuals stamp and the cat is a WRMM stamp, stamped onto black card, with Stickles for the eyes and collar the covered with Glossy Accents.The broom is made from a coffee stirrer and some raffia. The grass has been cut from a Sizzix die then covered in glitter, coloured with Lettuce Alcohol Ink.The inscription which does not show up very well on the photo reads Beloved Innocent 1692.
Until next time enjoy your crafting.
Georgina
It started out with the same premise a grave/tomb stone. I was thinking of Disney as my inspiration I love the walk through line of the hunted mansion with all the amusing sayings on the grave stones, I had several amusing ditties in my head I was going inscribe on to my grave stone along with a glittered black cat, some skeleton bones maybe a witches hat and broom, you get the picture. Instead I have ended up with something much more reflective.
I decided that I wanted to have an angel on my grave stone and as I had not used print on the background (as in Tim's tag) I decided to use print for the angel the closest thing to hand was an old news paper. While I was waiting for the ink to dry I was reading the paper as you do. It was an article about the lost of innocent life due to the interests greed, beliefs and the physical and cognitive behavior of others, which, got me thinking about how history has a way of continually repeating it's self, it seems we never learn what we never learn. Gosh! I sound very morbid and moralizing I don't mean to be, this is just my humble and simple tribute to all those innocent souls past, present and future, lost to the beliefs and actions of others.
The card stock is coloured in shades of grey Promarkers,The angel is a Crafty individuals stamp and the cat is a WRMM stamp, stamped onto black card, with Stickles for the eyes and collar the covered with Glossy Accents.The broom is made from a coffee stirrer and some raffia. The grass has been cut from a Sizzix die then covered in glitter, coloured with Lettuce Alcohol Ink.The inscription which does not show up very well on the photo reads Beloved Innocent 1692.
Until next time enjoy your crafting.
Georgina
Wednesday, 10 October 2012
Birthday Card for an Old Lady
Not really old in fact they say 50 is the new 30 and therefore Dorrie is unofficially 30 today.
As it's her birthday so she is having a having a day off. She is still at work but is playing. She used up Tally's extra paint a while ago and covered a couple of canvases to create backgrounds, she is now creating works of art in her brand new art apron that says Warning Artiste At Work, she is worried that she will get paint on it. I have told her that paint is good, how things change as a young girl she thought dirty garments much more interesting than clean ones. I keep trying to get a photo but every time she sees the camera she turns around, if I succeed I will post a picture later. In the meantime here is the card that I made her. She has been reminding me for the last week that I need to make a card. I kept telling her I could pick one up a card in Tesco's (apparently this is sacrilege)
I used a pearlescent card and stencilled a flourish using a Dreamweaver Stencil and Picked Raspberry and Peacock Feathers Distress Ink, where they merge they create a 3rd colour tone. I used the same inks to blend around the edges. The butterflies are stencilled using Dreamweaver embossing paste and sprinkled with perfect pearls. Instead of letting it dry naturally I used a heat gun which fuses the perfect pearls to the paste but also creates a bubbly effect in the paste. Then cut them out and positioned them on the card.
I made her pose and now she says I can't upload the pics but hey possession of the memory card is nine tenths of the law.
Well, I have to clean the bar as we have some bubbly to drink this evening so until next time
Happy crafting
Georgina
As it's her birthday so she is having a having a day off. She is still at work but is playing. She used up Tally's extra paint a while ago and covered a couple of canvases to create backgrounds, she is now creating works of art in her brand new art apron that says Warning Artiste At Work, she is worried that she will get paint on it. I have told her that paint is good, how things change as a young girl she thought dirty garments much more interesting than clean ones. I keep trying to get a photo but every time she sees the camera she turns around, if I succeed I will post a picture later. In the meantime here is the card that I made her. She has been reminding me for the last week that I need to make a card. I kept telling her I could pick one up a card in Tesco's (apparently this is sacrilege)
I used a pearlescent card and stencilled a flourish using a Dreamweaver Stencil and Picked Raspberry and Peacock Feathers Distress Ink, where they merge they create a 3rd colour tone. I used the same inks to blend around the edges. The butterflies are stencilled using Dreamweaver embossing paste and sprinkled with perfect pearls. Instead of letting it dry naturally I used a heat gun which fuses the perfect pearls to the paste but also creates a bubbly effect in the paste. Then cut them out and positioned them on the card.
I made her pose and now she says I can't upload the pics but hey possession of the memory card is nine tenths of the law.
Well, I have to clean the bar as we have some bubbly to drink this evening so until next time
Happy crafting
Georgina
Friday, 28 September 2012
Tim Holtz 12 tags of 2012 September
Or wise owl version 3
Yes, the 3 of us decided to use the same tag for Tim's 12 tags of 2012 September, you can see how he did it here. It started out with Dorrie saying are you going to us the Steam-punk owl stamp (Stampendous), I replied that I was going to but I could use another stamp. So off Dorrie went stamp in hand and started her tag. Meanwhile Mouse decided she wanted to do the owl entirely in metal. So I said why don't we all use the owl stamp and voila 3 very different tags see Dorrie's here and Mouse's. here.
I created a tag out of red card then created a smaller tag out of blue metal, using a selection of equipment from Walnut Hollow and Ten Second Studio I embossed a border, sanded it on the raised edges,I then scooched an pattern on the metal and re-coloured the exposed metal with pro-markers. I then created a leaf border on a separate piece of metal and again coloured it with Pro-markers.
I stamped Mr Owl onto newspaper using coffee Archival ink. Then covered the newspaper with Perfect Medium to make the paper go translucent. The image can then be seen on both sides I used the reversed image. I used Gel medium to stick Mr Owl to some card this also seals the sticky Perfect Medium. Once I had impatiently waited for it to dry I highlighted the image, again using Pro-markers.
It was then just a quick assembly job or so I thought. However Mr Owl looked very forlorn sitting on the tag a good excuse to get out some embellishments. I am really loving Prima's Junkyard findings (Available in our craft shop) at the moment. I tried to colour the clock face with Pro-markers but the surface was a bit resistant so I covered it with Gel Medium the re coated it with colour, my impatience got the better of me though as some of it wasn't quite dry and the printing of the clock face blurred a bit, but hay ho I like the grungy look. The light bulb says sweet so I added the word dreams with some letter peal off we had in the workshop stash.
Unlike last months tag, which I had lost my mojo for and to be quite honest was not my finest hour, a bit pants really, this months attempt I am really quite pleased with. Perhaps my mojo is back..
Enjoy your crafting
Til next time
Georgina
Yes, the 3 of us decided to use the same tag for Tim's 12 tags of 2012 September, you can see how he did it here. It started out with Dorrie saying are you going to us the Steam-punk owl stamp (Stampendous), I replied that I was going to but I could use another stamp. So off Dorrie went stamp in hand and started her tag. Meanwhile Mouse decided she wanted to do the owl entirely in metal. So I said why don't we all use the owl stamp and voila 3 very different tags see Dorrie's here and Mouse's. here.
I created a tag out of red card then created a smaller tag out of blue metal, using a selection of equipment from Walnut Hollow and Ten Second Studio I embossed a border, sanded it on the raised edges,I then scooched an pattern on the metal and re-coloured the exposed metal with pro-markers. I then created a leaf border on a separate piece of metal and again coloured it with Pro-markers.
I stamped Mr Owl onto newspaper using coffee Archival ink. Then covered the newspaper with Perfect Medium to make the paper go translucent. The image can then be seen on both sides I used the reversed image. I used Gel medium to stick Mr Owl to some card this also seals the sticky Perfect Medium. Once I had impatiently waited for it to dry I highlighted the image, again using Pro-markers.
It was then just a quick assembly job or so I thought. However Mr Owl looked very forlorn sitting on the tag a good excuse to get out some embellishments. I am really loving Prima's Junkyard findings (Available in our craft shop) at the moment. I tried to colour the clock face with Pro-markers but the surface was a bit resistant so I covered it with Gel Medium the re coated it with colour, my impatience got the better of me though as some of it wasn't quite dry and the printing of the clock face blurred a bit, but hay ho I like the grungy look. The light bulb says sweet so I added the word dreams with some letter peal off we had in the workshop stash.
Unlike last months tag, which I had lost my mojo for and to be quite honest was not my finest hour, a bit pants really, this months attempt I am really quite pleased with. Perhaps my mojo is back..
Enjoy your crafting
Til next time
Georgina
Subscribe to:
Posts (Atom)